When a child has a deep cavity that reaches the inner layer of the tooth, parents often worry about pain, infection, and whether the baby tooth can still be saved. In many such cases, a pediatric pulpotomy is the gentle and effective solution recommended by dentists.
A pediatric pulpotomy helps preserve a decayed primary (baby) tooth by removing only the infected portion of the pulp while keeping the healthy root pulp intact. This protects your child from pain, infection, and early tooth loss.
In this guide, we explain what a pulpotomy means, when it is needed, how it is done, and what parents can expect — all in simple, easy-to-understand language.
What Is a Pediatric Pulpotomy?
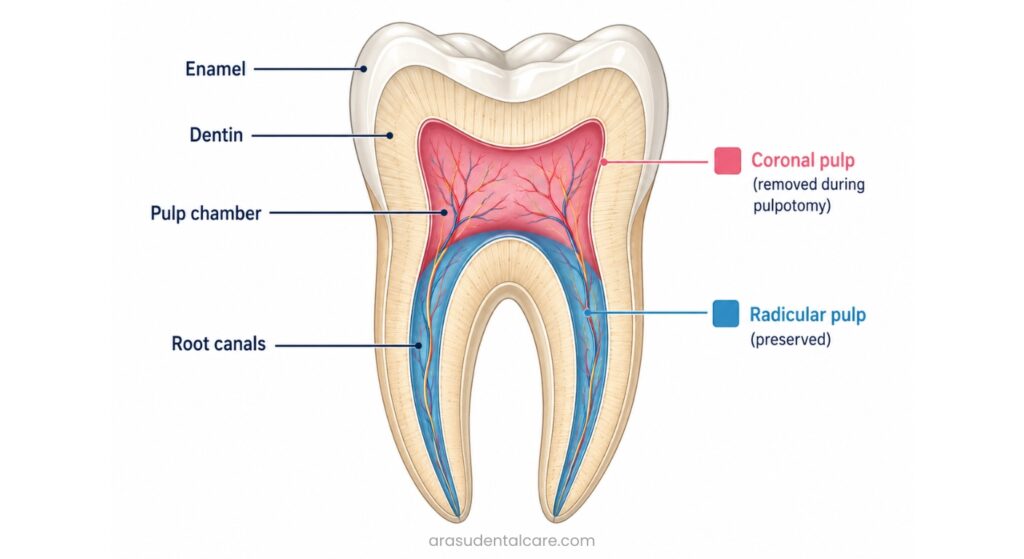
A pulpotomy is a small dental procedure done on a baby tooth when the decay has reached the pulp — the soft inner part of the tooth that contains nerves and blood vessels.
During the procedure, the dentist removes only the infected pulp inside the crown (top portion) of the tooth. The healthy pulp inside the roots is left untouched. A medicated material is then placed to protect the remaining tissue, and the tooth is sealed with a crown.
This treatment is sometimes called a “baby root canal,” but it is much simpler and shorter than an adult root canal. The goal is to keep the natural baby tooth in place until it naturally falls out.
Why Saving a Baby Tooth Matters
Many parents ask, “Why not just remove the decayed baby tooth?” While extraction may seem easier, baby teeth play an important role in your child’s overall development.
Guides permanent tooth eruption: Baby teeth hold space in the jaw for adult teeth.Losing them too early can cause crowding or crooked permanent teeth later on.
Supports speech development: Children learn to pronounce sounds and words using their teeth.Missing teeth at a young age may affect clear speech.
Helps with proper chewing and nutrition: Healthy teeth allow your child to chew food well.This supports better digestion and balanced nutrition.
Builds confidence: A healthy smile helps children feel good about themselves.It also encourages positive dental habits early in life.
According to the American Academy of Pediatric Dentistry, preserving primary teeth through pulp therapy is the preferred approach whenever possible.
Signs Your Child May Need a Pulpotomy
Early signs of pulp involvement are not always obvious. Children may not always describe their pain clearly, so parents should watch for these symptoms.
Persistent toothache: Pain that does not go away on its own or returns often.The discomfort may worsen when chewing or while lying down.
Sensitivity to hot or cold foods: Sharp pain when eating warm soup or cold ice cream.This usually indicates that decay has reached deeper layers of the tooth.
Visible deep cavity: A large dark hole or broken area on the tooth.This often signals that the decay has progressed close to the pulp.
Swelling around the tooth or gums: Puffy or red gums near the affected tooth.Sometimes a small bump or pimple-like spot may appear on the gum.
Difficulty chewing on one side: The child may avoid using the painful tooth.This can affect eating habits and food intake over time.
Tooth discoloration: A grey, dark yellow, or brown shade on a single tooth.This may suggest pulp damage from decay or trauma.
If you notice any of these signs, a dental examination is the best next step to find the exact cause.
Common Causes of Pulp Damage in Children
Understanding the cause helps in prevention and timely treatment.
Deep dental cavities: The most common cause of pulp infection in children.When tooth decay is left untreated, bacteria reach the inner pulp.
Dental trauma or injury: Falls, sports injuries, or accidents can crack a tooth.This can expose the pulp to bacteria, leading to infection.
Frequent sugary snacks and drinks: Sugar feeds bacteria that produce acids.These acids slowly break down the enamel and reach the pulp.
Poor brushing habits: Inadequate cleaning allows plaque to build up.This leads to faster decay, especially between the back teeth.
How Is a Pediatric Pulpotomy Done? Step-by-Step
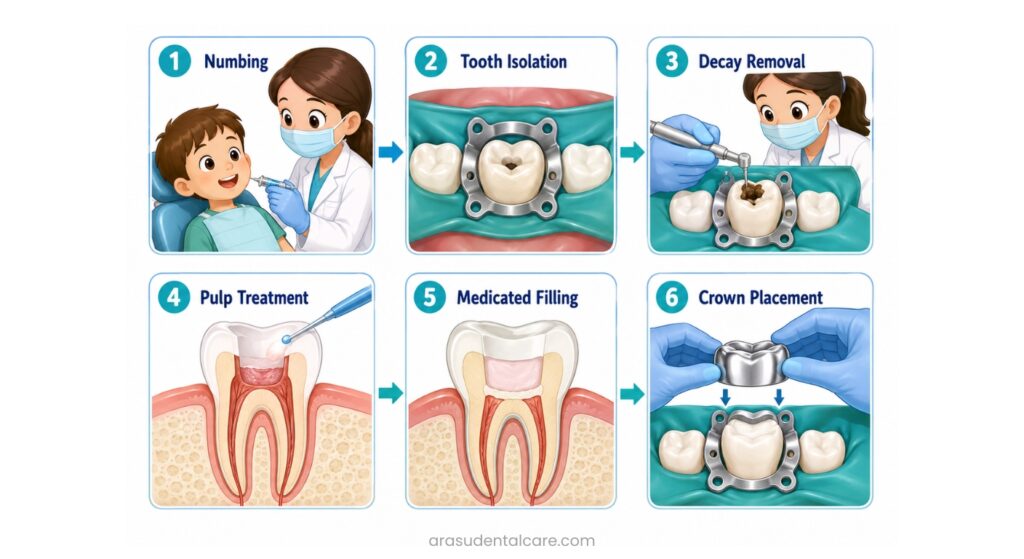
Knowing what happens during the procedure can help reduce anxiety for both parents and children. The entire treatment is usually completed in a single visit and takes about 30 to 45 minutes.
Step 1 – Gentle numbing: The dentist applies a numbing gel and gives a small local anaesthesia injection.This ensures your child does not feel pain during the procedure.
Step 2 – Isolating the tooth: A soft rubber dam is placed around the tooth.This keeps the area clean, dry, and safe from saliva contamination.
Step 3 – Removing the decay: The dentist carefully removes all the decayed parts.This step exposes the infected pulp inside the crown of the tooth.
Step 4 – Removing the infected pulp: Only the upper (coronal) pulp is removed.The healthy pulp inside the roots is left untouched to keep the tooth alive.
Step 5 – Placing a medicated material: A biocompatible material like Mineral Trioxide Aggregate (MTA) or Biodentine is placed.This protects the remaining pulp and supports healing.
Step 6 – Sealing and crowning: A filling is placed and the tooth is covered with a stainless steel or zirconia crown.The crown protects the weakened tooth until it naturally falls out.
Recent research published in PubMed Central shows that calcium silicate cements like MTA give the best long-term success rates for primary tooth pulpotomies.
Learn how pulpotomy treatment can relieve pain, remove infection, and preserve the health of primary teeth.
Pulpotomy vs. Pulpectomy: What’s the Difference?
Parents often confuse these two procedures. Both involve treating the tooth pulp, but they are different.
Pulpotomy: Removes only the infected pulp inside the crown.The healthy root pulp is preserved, and the tooth remains alive.
Pulpectomy: Removes all the pulp, including from the roots. This is done when the entire pulp is infected or dead, similar to a small root canal.
Your child’s dentist will decide which treatment is best based on a clinical examination and X-ray.
What to Expect After the Procedure
Recovery from a pediatric pulpotomy is usually quick and smooth. Most children return to normal activities within a few hours.
Mild soreness for a day: Some tenderness around the tooth is normal.Children’s pain relievers (as prescribed) can help if needed.
Soft foods for the first day: Foods like khichdi, curd rice, or mashed potatoes are gentle on the tooth.Avoid crunchy, sticky, or very hot foods for 24 hours.
Numbness for 1–2 hours: The cheek and lip may feel numb after anaesthesia.Watch your child to make sure they do not bite their cheek or tongue.
Regular brushing continues: Gentle brushing should resume the same day.This helps keep the area clean and prevents new infections.
How to Prevent the Need for a Pulpotomy
Prevention is always better than treatment. With a few simple habits, you can protect your child’s teeth from deep decay.
Brush twice daily with fluoride toothpaste: Use a small, soft-bristled toothbrush suited for your child’s age.Supervise brushing until at least age 7 or 8.
Limit sugary snacks and drinks: Reduce frequent intake of chocolates, juices, and sticky candies.Offer fruits, milk, and water as healthier alternatives.
Regular dental check-ups every 6 months: Routine visits help catch cavities early.Early treatment prevents the need for more advanced procedures.
Use of dental sealants: A protective coating placed on the back teeth.This shields the grooves where cavities often start.
Encourage water after meals: Rinsing with water helps wash away food particles.This is a simple habit that reduces the risk of decay.
The Centers for Disease Control and Prevention (CDC) recommends starting good oral care habits as soon as the first tooth appears.
When to Contact Your Dentist
While complications are rare, parents should be aware of warning signs.
Severe or worsening pain: Pain that does not improve after 2–3 days.This may indicate the need for further evaluation.
Swelling on the face or gums: Visible puffiness near the treated tooth.This could be a sign of remaining infection.
Loose crown or filling: If the crown comes off or feels unstable.The tooth needs prompt protection to avoid reinfection.
Fever or feeling unwell: Any signs of spreading infection. This requires immediate attention from your dentist or pediatrician.
Frequently Asked Questions (FAQs)
1. Is a pediatric pulpotomy painful for my child?
No, the procedure itself is not painful. Local anaesthesia is used to keep your child completely comfortable. Mild soreness afterwards is normal and usually goes away within a day.
2. How long does a pulpotomy last?
A successful pulpotomy is expected to last until the baby tooth falls out naturally. With a stainless steel or zirconia crown, the tooth can stay strong and functional for several years.
3. Can a baby tooth be saved without a pulpotomy?
It depends on how deep the decay has reached. If only the outer layers are affected, a simple filling may be enough. However, when decay reaches the pulp, a pulpotomy is often the best way to save the tooth.
4. Will my child need a crown after a pulpotomy?
Yes, in most cases. A crown protects the weakened tooth from breaking and helps it last until the permanent tooth erupts. Stainless steel and tooth-coloured zirconia crowns are commonly used in children.
5. Are there any risks in a pediatric pulpotomy?
The procedure is very safe when done by a trained dentist. In rare cases, the infection may persist, and additional treatment such as a pulpectomy or extraction may be needed.
6. How do I know if my child needs a pulpotomy or extraction?
Only a dental examination and X-ray can confirm this. If the pulp is still partly healthy, a pulpotomy is preferred. If the tooth is severely infected, fractured beyond repair, or has caused damage to the surrounding bone, an extraction may be the only viable option.
7. What happens if a pulpotomy is not treated on time?
Delaying treatment can lead to serious consequences for your child’s oral health. If an infected pulp is left untreated, the infection can spread deeper into the root, surrounding gum tissue, and even the underlying permanent tooth bud — affecting your child’s future smile.
8. How should I care for my child’s tooth after a pulpotomy?
Post-treatment care is simple but important. Avoid giving your child hard or sticky foods for the first 24 hours after the procedure. Encourage gentle brushing and flossing around the treated tooth and ensure your child does not bite or chew on that side until the numbness completely wears off.